What To Do When The Pope Spams You
Aka: How to do POST requests using Curl
My parents, being Catholic, signed up for a newsletter from the Vatican (as one does).
After a year or so of receiving it, they eventually realised they weren’t really reading it, and wanted to unsubscribe.
No problem. At the bottom of each message is the legally required footer:
Cancellare – that sounds about right (why the footer is in Italian when the rest of the newsletter is in English I have no idea).
Clicking Cancel(lare) takes you to this page:
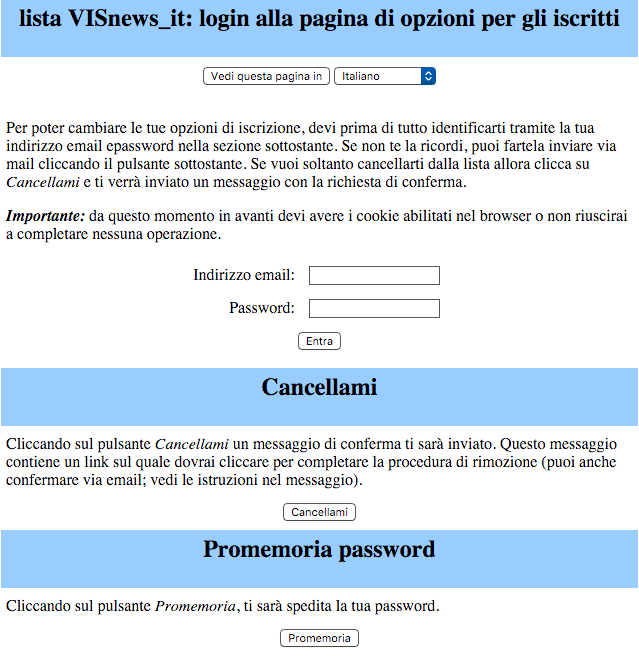
With the default language set to Italian, despite coming from our English newsletter (nice one).
You can change the language at the top from Italiano to Inglese (USA) – although again, why it’s necessary to specify the USA version of English (not just “Inglese”) on a subscription management page, I have no idea.
It then looks like this:
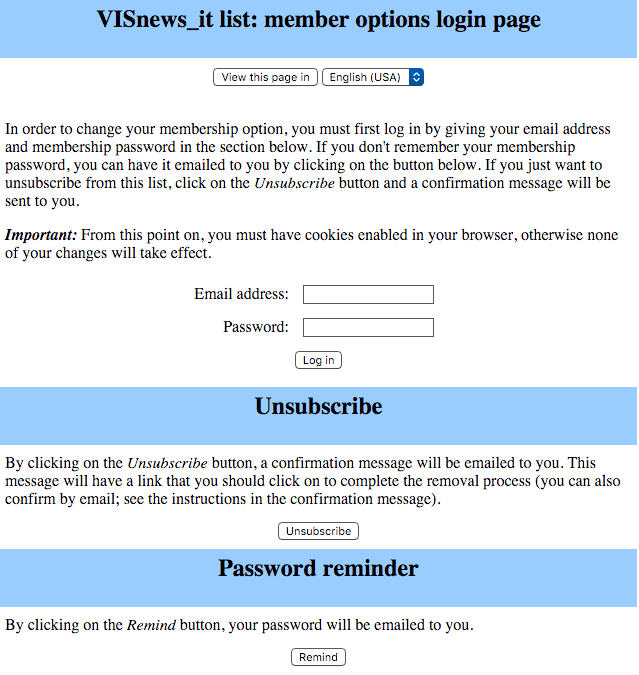
Ok, so far so good.
Now. Just enter your email address (easy) and password, and we can begin.
Oh. What’s the password?!? Well hell, do YOU remember the passwords to every obscure service you signed up to a year ago that you haven’t thought about since?
Minor speed bump.
What about if we try it without our password? After all, unsubscribing should be easy. I mean, The Vatican, of all places, wouldn’t consciously want to SPAM people, would they?
So, enter your email address, click “Unsubscribe” and voila. The page refreshes, and you get a helpful message:
![]()
Except nothing actually happens. The unsubscribe email never arrives.
Now, there’s another fairly major niggle here – why the hell is it a double opt-in to unsubscribe? That’s VERY spammy. Lists should be hard to get onto (ie, double opt-in) – so, say, someone else can’t accidentally put your email address on a list. They should be easy to get off of. The Vatican has this completely ass-backwards. It’s spammy.
Ok, anyway, maybe we can get our password, and then change our email address to something that doesn’t work (fuckoff@nospam.com is a personal favourite).
Now our email address is entered we can click the Password Reminder button “remind”.
Except the password reminder button doesn’t work either.
You can click it – as many times as you like – and nothing happens. Ever.
So. What next? Well. We could try emailing them directly (no response), or via their contact form (no response). Several times, in fact (no response).
One day, The Vatican in its infinite kindness will get around to fixing this page. In the meantime they’ll keep happily blasting out emails every day, no doubt delighted in how many (angry and frustrated) believers they’re reaching.
However, as soon as the page IS fixed, we’d like to be off the damn list please. And I mean, within the day.
Enter Curl, stage left.
Curl is a nifty little unix app mostly used for getting web pages. It’s very helpful for things like debugging sites, because you can use it to view the headers on a site, like this:
curl -I -L google.com
(-I == just show the headers not the page content, -L == follow redirects)
Which shows lots of groovy useful technical stuff. If you’re into that kind of thing (I occasionally am).
However, a lesser known use of curl is to make POST requests (like entering a form) not just GET (getting a web page). Unsurprisingly, being unix, there’s a billion other things you can do with Curl, but we’ll stick to POST for today.
To do this, we just have to have a nosey into the page content, find the forms we want to enter the data for, and which fieldnames we want to use.
So, if we look at our Cancellare page, the HTML looks like this:
<FORM action="../options/visnews_it" method="POST" >
  <INPUT name="email" type="TEXT" value="" size="20" >
  <INPUT name="password" type="PASSWORD" value="" size="20" >
  <INPUT name="login" type="SUBMIT" value="Log in" >
  <INPUT name="login-unsub" type="SUBMIT" value="Unsubscribe" >
  <INPUT name="login-remind" type="SUBMIT" value="Remind" >
</FORM>
I’ve stripped out all the other HTML junk (tables, text etc) and just left the form and inputs.
So, you can see – there’s a place to enter email, password, and then three submit buttons. One to login, one to unsubscribe, one to send a password reminder.
Why would we want Curl here?
Well, we can make Curl do this form request for us. We don’t have to start up a browser and enter all our details manually. Every day. Forever. Until they fix their site.
The command line goes like this:
curl –data “name=value&name=value&name=value” FORM_ACTION_URL
The form action URL (if you follow their up-and-down–into-the-same-directory bit) is http://mlists.vatican.va/mailman/options/visnews_it
We also want to enter our email address, and then finally, click the unsub button.
Thus, the name/value bit ends up:
email=[our email address]&login-unsub=Unsubscribe
If we wanted to get curl to send us a password reminder, we’d just change it to
email=[our email address]&login-remind=Remind
The only gotchya is that you can’t send @ characters. You have to escape them. So, instead of “email=bob@smith.com”, you’d have to use “email=bob\%40smith.com”
Thus the entire line become
curl –data “email=bob\%40smith.com&login-unsub=Unsubscribe” http://mlists.vatican.va/mailman/options/visnews_it
Finally, chuck the whole thing into crontab to run every 6 hours:
3 */6 * * * curl –data “email=[our email addr]&login-unsub=Cancellami” http://mlists.vatican.va/mailman/options/visnews_it > /dev/null 2>&1
and voila. (The “> /dev/null 2>&1” is just dark magic to say “ignore all output, even errors”)
Oh, login-unsub is set to Cancellami just because that’s what the original Italian form had. I figured they’d be more likely to fix the Italian unsubscribe before they fixed the English one (if they’re set up independently).
Once the Vatican gets their site working again, we’ll get an email (well, four a day), then we can click unsubscribe and I’ll delete the one line cron job. Easy. Until then, we’ll just delete the spam, happy in the knowledge that our little curl robot is taking care of things for us in the background.
related
Some Swype Tips
I first saw Swype (the funky text entry system) on a friend’s Android phone several years ago. So, you can imagine how eagerly I awaited it on iOS, and my excitement when it finally arrived. I’d estimate it at roughly three times faster than the built in iOS keyboard (which itself is something of a technical marvel).
Needless to say, while Swype truly is great, it still has a few rough edges. However, with some judicious googling, moderate experimentation and a lot of hunting through forums, I’ve found a few hidden gems that makes using it a LOT less painful.
(because keys aren’t hit one after another, I’ll describe Swype motions with hyphens. Eg, Swyping cat would be c-a-t – ie, you start at c, then swipe your finger up to a, then across to t)
Handy Shortcuts
- comma-space gives you a comma followed by a space
- fullstop-space gives you a full stop followed by a space
- l-space gives you “
- x-space or z-space gives you !
- m-space gives you ?
- You can swipe directly from the 123 button to any of the keys on that second key layout (all the numbers and common non-alpha characters) without having to change from normal entry mode
Swype key(the ‘S’, bottom left)-gear icon takes you to options. From here you can see your personal dictionary, and delete items (by swiping left) if you want to get rid of them. You can also change the colour of the keyboard, etc.
The REAL best secret tip
Most useful though? If you click-and-hold on a word on the word bar (the list of words that appears just above the keyboard), you can delete words from the dictionary. This includes words in THEIR dictionary, not just your own. This is BRILLIANT.
The reason this is so helpful? Because so often we’ll end up accidentally dragging across words we didn’t intend. And there are some REALLY dopey words in there that are very close to common ones. Eg, Bachmann (as in Michelle Bachmann, American right wing banana) instead of Banana. Abutting is right next to Anything. Luge disrupts my attempts at Life. Etc. So, when you find a silly word appearing, pause, swipe the same word a few times until you see the stupid word in the wordbar, then press and hold and you’ll delete it. Voila, it’ll never pop up again.
Other stupid words are things like “m.p.h”, so anytime you swipe m-. instead of .-space (both VERY close to each other) you get “m.p.h” instead of “. ” *SIGH* I spent WEEKS manually backspacing “m.p.h” until I learned about the word delete trick. Since then, ahh, I’ve probably saved myself from having to delete it 15-20 times a day. Excellent.
I’ve also found that deleting names (proper nouns) I know I’m never going to need (I can always type them in manually if I ever do use them) – eg I would always get Erik, instead of With – made a huge difference in terms of how often incorrect words appeared.
By the time you’ve deleted 20-30 of your common mis-swypes (and they vary from person to person – all our hands are different sizes, etc), you’ll find that the keyboard works very noticeably better.
related
17.Nov.2014How to Fix Multiple GoogleVoiceAndVideoAccelSetup_5.38.5.0’s Mounted
This should work for any GoogleVoiceAndVideoAccelSetup mounted virtual drives, or other Google apps (eg Google Earth) that misbehave in a similar way.
This problem is exhibited when you open a new Finder window, and it looks like this:

ie, there’s a bunch of mounted packages, which you can’t unmount/eject.
There are three possible ways to fix this:
1. Uninstall the plugin
To uninstall in Windows:
- Click Start > Settings > Control Panel.
- Double-click Add or Remove Programs.
- Scroll down to find Google Talk plugin.
- Click Remove, then Yes, then Finish.
To uninstall in Mac OS X:
- Open Finder and then open the Terminal application.
- Copy and paste the following command into the window (remove the space): /Library/Application\ Support/Google/GoogleVoiceAndVideoUninstaller.app/ Contents/MacOS/GoogleVoiceAndVideoUninstaller
- Press Enter on your keyboard.
(from here)
(I tried this, but it didn’t work)
2. Delete all /private/tmp/KSInstallAction*.* files
(I didn’t have these files on my machine)
3. Delete all /private/tmp/2014* files (or whatever year it currently is)
These typically look like this:
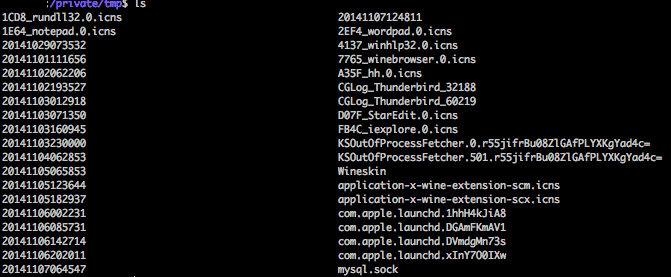
Only the last option actually fixed my machine.
After I’d done that I restarted Chrome and restarted my machine. Sorry, I don’t remember which one specifically fixed the issue.
I’d suggest just doing the above and checking if the mounted packages are gone. Then try restarting Chrome. Finally restart your machine. Ie, in increasing order of tediousness.
This will also work if Google Earth misbehaves in the same way.
I dunno what Google is doing with their install routines, but it’s pretty broken and more than a little dopey. I’m sure they’ll fix it. One year.
related
24.Aug.2014How To Make A Razor Blade Last Forever
Wanna know how to never have to buy another razor blade? No, seriously.
First, watch this:
Ha ha, this one cracks me up coz you never REALLY know if the dude’s naked or not.
BUT ANYWAY.
(and in case the vid is broken, for whatever reason), the basic gist is this:
- When your razor starts to pull at your hair, or feel blunt?
- Run it AGAINST the grain, UP your arm 10 or so times (ie, NOT shaving your arm, the other direction). Do this on the hairless, inside part of your arm for maximum effectiveness
This will sharpen the blade, indefinitely.
How does this work? Well, know how ye olde timey barbers would use a leather strop to sharpen a cut throat razor?
Well, what’s leather? It’s processed animal skin, right? So, you’re basically just using your arm as a strop.
If you have a strop, feel free to use that instead, of course – but be warned, a strop is likely to be rougher than your arm (which while skin, isn’t processed), so it MAY wear the blades faster. Razor blades these days are super fine, unlike cut throat razors, which are made of much heavier and softer metal.
Why this works is, when we use a blade, we tear off little bits of metal, leaving slight jags and nicks. These eventually start to pull against our hair and voila, blunt blades.
However, by running the blade BACKWARDS, we smooth all those nicks and jags out, thus re-sharpening the blade.
Oh, some other useful tips. The key to all these is – you want to keep the blade DRY between uses, otherwise the blade will rust and you’ll have to throw it out.
- When you’re using it, whack the head of the razor (blade size down, but without hitting the actual blades) against the wall of a shower, or sink, to loosen any hair that’s gummed up in it
- Run brisk water through it to free any more hair. Repeat steps 1 and 2 until it’s completely clear and clean. Reason? Any hair that’s left in there will hold water, which will rust the blade
- Finally, whack the razor a few times against a towel to shake any water droplets out of it
- Store it somewhere dry (ie, NOT in the shower)
I’ve heard recommendations to keep your blade in oil, but that seems like an awful lot of work to me.
So, the guy above says he’s used the same blade for ten months (at the time the vid was taken). But does it REALLY work?
Put it this way.
I used to have to change my blade EVERY week. If I started on a Monday, by the following Tue/Wed, I’d be ripping my face open. I have a combination of soft skin and a tough beard. Yay me. ANYWAY. Point is, my beard would blunt blades super quickly, and my skin would notice when they were blunt.
So, that’s 52 blades a year, every year.
Since I started doing this every day?
I’ve had the same blade for four, maybe five years. I honestly don’t remember, just that I’ve had it since 4 countries ago.
Yes, this technique works. Amazingly well.
So, go forth! Shave to your heart’s content and never pay the razor companies another cent!
Ps. the poetry is also free.
related
18.May.2014Building Stencyl Haxe files inside Sublime Text
Building Haxe files inside Sublime Text is pretty much a solved problem, thanks to the Haxe-Sublime-Bundle.
However, using Sublime to externally edit Stencyl Haxe files is a bit trickier, since Stencyl has a ton of dependencies.
Of course, this makes developing much easier and faster, but the build is a bit more complicated than the standard build bundle can handle.
The standard edit/build cycle is:
- In Stencyl, click to edit the file externally
- Edit in Sublime Text (the built in Stencyl editor is pretty crap)
- Save
- Swap back to Stencyl
- Save again (because Stencyl is a bit daft)
- Click the Check Syntax button (there’s no keyboard shortcut)
This takes maybe ten seconds, which includes quite a bit of messing around, plus using the mouse (always slower).
Here’s a much faster way (Mac only. Sorry if you’re on Windows, you’ll need to convert the bash script to DOS. If you’re on Linux, you may need to tweak the gamename= line):
Create a bash script for the actual build:
#!/bin/bash
# parameters – filename to build (including path)
gamespath=/c/g/dev/stencylworks/games-generated
if [[ $1 == */* ]]; then
sourcefile=$1
else
sourcefile=$(pwd)/$1
fi# find current game
cd $gamespath
gamename=$(find ./ -iname *.hx -type f | sed -e ‘s/ /\\ /g’ | xargs ls -tr | tail -1 | cut -d “/” -f3)cp $sourcefile “./$gamename/Source/scripts/”
cd $gamespath/$gamename
/Applications/Stencyl/plaf/haxe/haxe -cp Source/ -cp Export/flash/haxe/ Export/flash/haxe/debug.hxml
You’ll need to change the gamespath (at the top) to wherever you’ve decided to save your Stencyl games. Specifically, the games-generated directory.
The matching against $1 just means if you pass in a full path (as Sublime Text does) then it uses that. If you’re in a directory and just pass the filename (as you would if you ran the script from the commandline) it’ll auto-add the current directory.
The only vaguely tricky bit is the line that finds the game name for the most recently edited file (ie, the one you’re working on). You can pretty much ignore that line of gibberish, but hey, if you REALLY want to know…
First it finds all the .hx files in the games-generated subdirectories. Sed sorts out any spaces in the paths (so the remaining commands don’t puke), passes the whole lot through to ls to sort by time (so the newest one is last). Tail gets the last one. And cut gives us the root directory – ie, the game name.
Complicated, but it works.
The last line, starting “/Applications/Stencyl” is all one line (in case it line-wraps on your screen)
(don’t forget to chmod +x the file so it’ll execute)
So, that’s bash.
On the Sublime Text side, you need to do the following:
1. Tools | Build System | New Build System
2. Enter the following:
{
“cmd”:[“/usr/local/bin/build_stencyl_haxe”, “$file”],
“selector”:”source.hx”,
“env”:{“HAXEPATH”:”/Applications/Stencyl/plaf/haxe/”, “HAXE_STD_PATH”:”/Applications/Stencyl/plaf/haxe/std”}
}
3. Save the file as haxe.sublime-build in the directory it defaults to
Now, some important notes here.
- You’ll need to replace the /usr/local/bin/build_stencyl_haxe with wherever you’ve saved the bash script above
- The selector line just means that the auto build chooser will identify any *.hx files as haxe files and use this build command set. That’s the theory. However, there’s an hxml build built in, which doesn’t take into account the Stencyl specifics. So, auto-build won’t work anyway. This isn’t a big deal, you’ll just need to select Tools | Build System | Haxe to manually select the build type. Hardly the end of the world. If anyone knows how to stop the default hxml type from taking precedence, I’d be curious to know.
- The env line I’ve had to put in because I have a couple of different versions of Haxe on my system. This ensures that the build process runs the Stencyl version of the libraries, so nothing gets confused. You may not need that. If you delete that line, be sure to remember to delete the trailing comma from the end of the selector line, otherwise Sublime Text will complain
When you’re done, just save it in the current directory (it’ll be something like ~/Library/Application Support/Sublime Text 2/Packages/User) with the name Haxe.sublime-build. Whatever you put before the ‘.’ is whatever will appear in your Build Tools menu.
So, that looks like a lot, and it did take me a good solid day to nut it all out and get it working well. There’s really not much though – c&p the bash file somewhere, change the path, save & chmod it, then c&p the build file into a new build tool option, point it at your bash script, save it and you’re pretty much done.
Here’s the good news:
- You don’t even have to save the file in Sublime Text in order to run the build – it’ll auto save
- If you’ve got the Built type selected in Sublime Text, a simple Command-B (on Mac) will build it
- It typically takes me 0.3s to build the file (if it finds an error, a bit over a second for a full game build) – whereas all that fiddling around back and forth to Stencyl took around 10.
For something you’re likely be doing hundreds of times a day as part of your core dev cycle, that’s a huge gain.
related
03.Apr.2014Wine on OSX: org.freedesktop.dbus-session.plist
It’s very common when running Wine apps on Max OSX to see the following error (usually the first line of the wine output):
Dynamic session lookup supported but failed:
  launchd did not provide a socket path,
  verify that org.freedesktop.dbus-session.plist is loaded!
The fix for this is very simple. From terminal, run:
sudo launchctl load -w /Library/LaunchDaemons/org.freedesktop.dbus-system.plist
[enter your password:]
and then:
launchctl load -w /Library/LaunchAgents/org.freedesktop.dbus-session.plist
Simple, and yet oddly not well documented. Hence, posting it here. Hope it helps.
related
24.Sep.2013OSX 10.8.5 Komodo 8.5.0 mozpython crash (image not found)
Running Komodo Edit (or IDE) on OSX, with some of the recent (10.8.5) system updates, you can get this delightful error message:
Image not found
With an error report containing:
dyld: Library not loaded: @executable_path/../Python
Referenced from: /Applications/Komodo Edit 8.app/Contents/MacOS/mozpython
Reason: image not found
Mashed in between a page of incomprehensible gibberish.
What does this mean? Oh, it’s just being a bit stupid, and lost track of where its own bits and pieces are. Ie, the mozpython embedded in Komodo can’t find the Komodo Python interpreter. “Help help I can’t find the forest, all these stupid trees are in the way!” Etc.
One side effect is it stops you being able to navigate to a function definition – which is a little annoying.
Until they roll out an updated version of Komodo, a short term fix is:
sudo install_name_tool -change “@executable_path/../Python” “@executable_path/../Frameworks/Python.framework/Python” “/Applications/Komodo Edit 8.app/Contents/MacOS/mozpython”
Note you’ll need to change “Edit” to “IDE” above if you’re using the IDE version of Komodo.
You can do this without restarting Komodo. Searching for a definition will then spin its wheels for a while, reorganising its brain, then after that everything will (should) be hunky dory again.
related
07.Sep.2013OSX MySQL DYLD_LIBRARY_PATH libmysqlclient.18.dylib – fix
For some reason, the OSX version of MySQL can’t find its own libraries.
If you’re trying to connect to MySQL from code (in this case, Python, and the MySQLdb library), you’ll typically see something like this:
Traceback (most recent call last):
File “demo.py”, line 3, in <module>
import MySQLdbFile “/Library/Frameworks/Python.framework/Versions/2.7/lib/
python2.7/site-packages/MySQLdb/__init__.py”, line 19, in <module>
import _mysqlImportError: dlopen(/Library/Frameworks/Python.framework/Versions/2.7/lib/
python2.7/site-packages/_mysql.so, 2): Library not loaded: libmysqlclient.18.dylibReferenced from: /Library/Frameworks/Python.framework/Versions/2.7/lib/
python2.7/site-packages/_mysql.soReason: image not found
Which basically translates to “Duh, I can’t find myself.”
Specifically, it’s looking for the file libmysqlclient.18.dylib in /usr/lib, and not finding it – why? Because it installed it in /usr/local/mysql/lib. It’s been broken a few years.
Yay open source!
Anyway, there are several fixes out there, with varying levels of crapness.
The standard recommendation is to put this in your .bashrc (or .bash_profile) in your home dir:
export DYLD_LIBRARY_PATH=/usr/local/mysql/lib
Which fixes the problem, except then every time you try to run anything that isn’t MySQL related from the command line, you get a stupid message like this:
si@home:~$ su
dyld: DYLD_ environment variables being ignored because main executable…
(/usr/bin/su) is setuid or setgid
Password:
This gets old and boring verrrrry quickly.
Another suggestion is to put the export statement at the start of any script that uses MySQL, followed by an equivalent unset command at the end (so you’re not polluting the environment).
Now, have a quick think about how many different places you’d have to put this in (ie, any script or code that connects, accesses or uses any code at all that talks to MySQL). BORING.
After I’d edited 5 or 6 scripts I decided “ok, this is crap, there must be a better way.”
So, what’s the cleanest solution? Specifically, one that avoids having to alter everything you ever write, just to get around a (hopefully soon fixed) bug in the MySQL installation?
Do this:
sudo ln -s /usr/local/mysql/lib/libmysqlclient.18.dylib /usr/lib/libmysqlclient.18.dylib
In other words, create a link from /usr/local/mysql/lib (actual location) to /usr/lib (the place MySQL goes looking).
No coding around the bug, no spurious and/or dangerous environment variables. Simple, clean, with minimal or zero side effects.
[update: It’s been further suggested, by Gary Allen Vollink, below, that linking to /usr/local/lib might be more upgrade friendly – and thus safer – than /usr/lib. Please read his comments. I’m inclined to agree]
related
30.Jul.2013Macbook Air Wifi – full bars, but no internet. FIX
I had a niggling issue with my MacBook Air net connection.
After coming out of standby, I’d have perfect connection to the nearest router, but no internet connection. Ie, this:
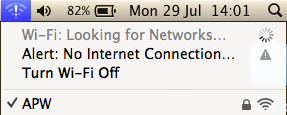
Note the combination of full bars to the wifi network (ie, wifi is working perfectly), but the alarming message “Alert: No Internet Connection”. This exciting combination means “The network is there, but you can’t use it. Nyargh.”
After much googling and fiddling around, it turned out that:
- Although Wifi was connecting perfectly, DHCP was failing (ie, the MacBook could see the router, but it wasn’t being assigned a correct IP address, thus, couldn’t talk any further down the line)
- DHCP was failing because incoming TCP ports 67 & 68 were blocked.
You could see there wasn’t a valid IP address by looking in System Preferences | (Internet & Wireless) Network | Advanced | TCP/IP. Firstly, there’s an address in the 169.* range, but it also says “Self-Assigned IP Address.” This just means the MacBook has given up trying to get a (correct) address from the router, and said “Screw it, I’ll be over here, sulking.”
There’s a quick summary of this on the Network page (under Status, top right)
Of course, running ifconfig in a terminal session would also show you this, in a fraction of the time
Turns out that in a recent bout of firewall installing/configuring, I’d been a little over-eager and accidentally blocked this critical system port. Interestingly, it didn’t fail immediately, only when I moved to a new network.
Obviously you also need to allow outgoing TCP on ports 67/68 for DHCP to work correctly.
There are many MacBook Air wifi issues, it would seem; this has been one of them. Hope it helps.
related
17.Jun.2013How to make iOS Auto Correct suck slightly less
If you’ve used an iPod/iPad/iPhone, you will have been exposed to the iOS Auto Correct function.
Generally, this works amazingly well. Type something like ‘intesrtkbg’ and it will automagically adjust it to the desired ‘interesting’.
As brilliant as this is, it has some definite blind spots.
Swearing
The first blind spot you’ll notice is if you try to swear. Apple in its infinite wisdom decided that humans never use uncouth language.
Search for ‘ducking auto correct‘ to see how the internet responded to this design decision.
Yes, most versions of ‘fucking’ will be auto corrected to ‘ducking’. Nice one Apple.
Interestingly, Google’s Android allows you the option to switch auto-corrected swearing on or off (a much smarter decision).
To fix this problem, do this:
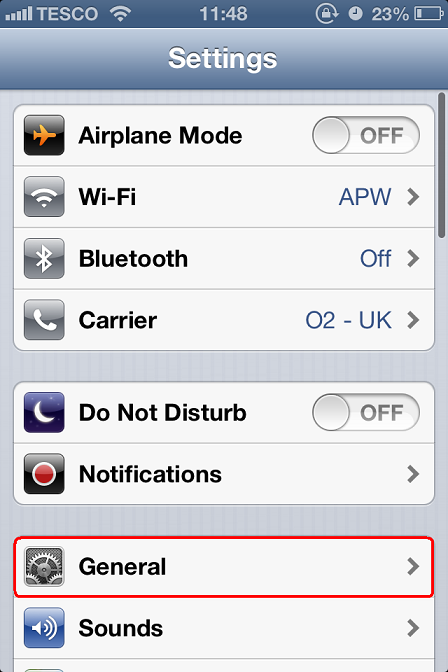
Go to Settings – General:
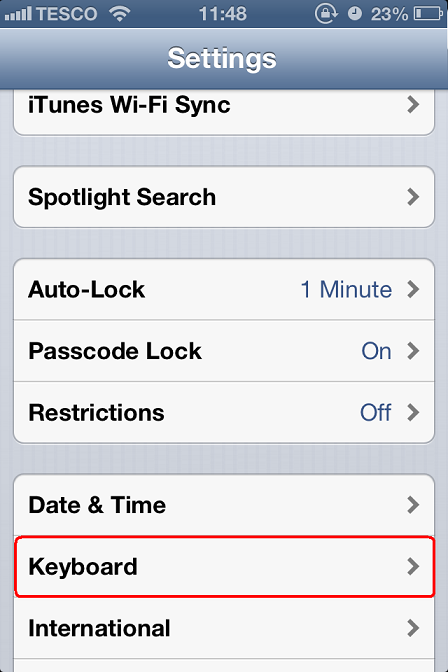
Keyboard:
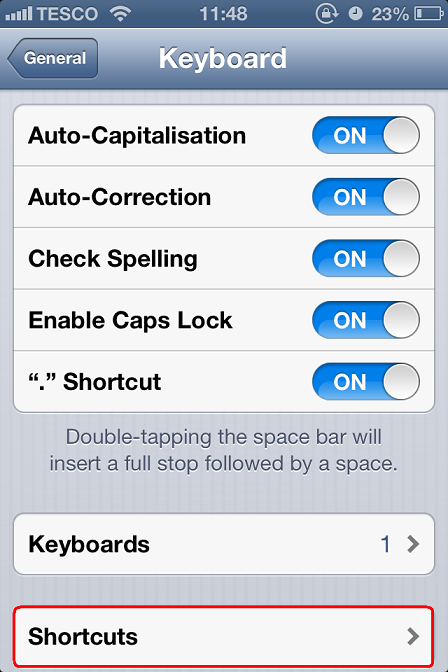
Shortcuts:
click ‘+’ (top right):
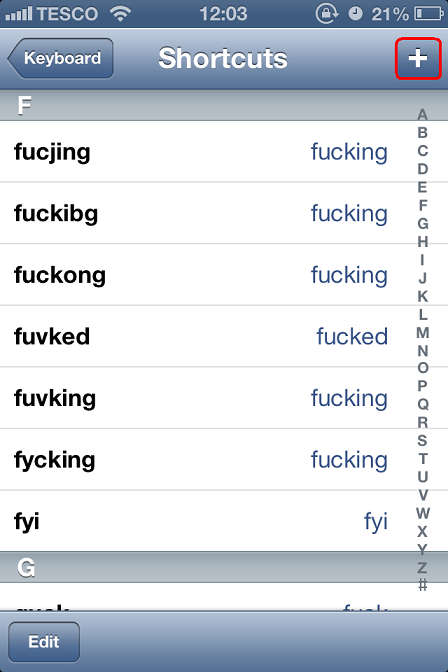
Now, for phrase, enter the word you want to appear (eg ‘fucking’)
For shortcut, enter the badly typed version (eg ‘fucjing’)
Some examples to get you started
- atse -> arse
- bullshot -> bullshit
- guck -> fuck
- fuvked -> fucked
- fucjing -> fucking
- fuckibg -> fucking
- fuckong -> fucking
- fuvking -> fucking
- fycking -> fucking
- ducking -> fucking (coz really, when are you going to NEED to write ‘ducking’?)
- ahitty -> shitty
- shiity -> shitty
- shirty -> shitty
- shityy -> shitty
- shotty -> shitty
and so on. I, uhh, may have a penchant for licentious terminology.
You can see what a great job auto correct does normally, once you have to manually enter every single variant of a given word in order to catch them all. It really is quite a slick piece of software.
DON’T “CORRECT” THIS
The second common issue is when you type a word that isn’t in the iPhone’s dictionary, and which you don’t want adjusted.
Eg, I use the word ‘psst’ quite often. For example, “Psst! I quite like you.”
Auto correct helpfully “corrects” this to ‘past’.
To fix this type of problem, enter:
PHRASE: psst
SHORTCUT: psst
By doing this, you can type psst, and not have auto correct change it.
You can also speed these up – you don’t HAVE to enter the shortcut. You can just enter the phrase, and it will assume the shortcut is the same.
Some other words I’ve done this with:
- blergh -> blergh
- fyi -> fyi (which it otherwise uppercases)
- hee -> hee
- hrm -> hrm
- hrmph -> hrmph
- nfi -> nfi (ditto on the uppercasing)
- np -> np
- oi -> oi
- sat -> sat (which it always changes to Sat or sit)
- xo -> xo
- youch -> youch
EMOTING
I’m not a huge fan of emoticons. They’re often a little vague (is it smirking? a fat man with gas? an alien with a mouthful of beans?). I guess all those years on IRC make me prefer a combination of old school emoticons, eg :) and actually writing whatever action I’m doing. Eg *laugh* – it just feels like it’s going to more accurately convey the message I’m sending (without requiring any more effort)
Now, typing that out all the time is a huge hassle (too many keyboard swaps), but here’s where keyboard shortcuts come to the rescue! I’ve just started each with ‘z’ coz it’s easy to get to, and unlikely to be used for anything else. You could also use ‘x’ (for eXpression) if you felt like getting a little onomatopoeic.
- zc -> *cough*
- zf -> *facepalm*
- zg -> *grin*
- zh -> *hug*
- zl -> *laugh*
- zn -> *nod*
- zp -> *phew*
- zs -> *smile*
- zsh -> *shrug*
- zw -> *wink*
etc. You get the idea.
AMERICANIZATION
I have my phone set to the Queen’s English (you know, the real one, where they named the country after the language). However, for some *cough* obviously-far-more-sophisticated-than-I-can-understand reason, iPhone’s autocorrect insists on Americanising everything. So, I’ve given it a helping hand back to “proper spelling”:
- analyze -> analyse
- analyzing -> analysing
- criticize -> criticise
- energized -> energised
- generalize -> generalise
- honored -> honoured
- optimize -> optimise
- organization -> organisation
- prioritize -> prioritise
- realization -> realisation
- realize -> realise
- realized -> realised
- traveling -> travelling
Obviously, I’m going to be at this a while. That’s ok, I’m patient and persistent. Also, duck you, monoculturally focused Apple!
SOME OTHER USEFUL SHORTCUTS
A few other short cuts I’ve found handy to add, to stop auto correct from mis-correcting things:
- thatd -> that’d (which it otherwise adjusts to that’s)
- whatd ->what’d
- sude -> side
- rtc -> etc
- cx -> xx (for some reason I always end up hitting ‘c’ first)
- cxx -> xxx
- rem -> remember (lots of ‘m’s = easy to hit delete by mistake)
- :$ -> :) (common mistype)
- /) -> :) (ditto)
- sicom -> my @sidawson.com email address
- siorg -> :) my @sidawson.org email address
Generally, anytime auto correct misbehaves, as soon as I’ve finished that message, I go and enter one of these fixes so I never have to swear at my phone again. Mostly it helps.
and of course, one final correction:
- sac -> stupid auto correct
coz really, even with these improvements? You’re still going to want to explain typos, and this last shortcut will save you a lot of typing. Stupid auto correct. Stupid auto correct. Stupid auto correct.